Podman with VXLAN Overlay Network Deep Dive
Table of contents
What’s the difference between users and engineers? Mostly, engineers are not satisfied with “It just works”. Over the last couple of days I did a deep dive into the ocean of container networking. Maybe you know that most of my posts are usually covering Docker topics but why I am writing about Podman today? Simply because Podman does not have the possibility to build overlay networks out of the box (in the Kubernetes area this is the task of a CNI plugin) and furthermore there are no articles about this specific topic available online. Beyond this, Docker already does all the following steps out of the box for you - without Kubernetes and CNI. But if you are running a quite small Docker Swarm setup and if you would like to migrate it to Podman without the Kubernetes thing (including the network layer), this might be a thing for you (if you are a gearhead)… 🤗!
In general, I am always curious about how the different solutions are build and with the release of RedHat’s OpenShift 4 I was triggered to get to know how things are working in detail there - because most of the time everyone cooks with the same water. 😂 And there is the kube-ovn and the question was: “How is this all stitched together?”
The background of the featured image of this post comes from the movie “Apollo 13”, from a special scene where Jim Lovell (who’s actor was Tom Hanks) did some quick manual calculations - you can re-watch this scene here. For me thats the imagination of the difference between users and engineers. Engineers can go on when users run out of possibilities, because it is their job to know whats going on in detail.
Important note!
In the following post I am using a lot of information from other people work and I will reference every source! All (or at least most of) the information for this post is already out on the internet but it is fragmented, shattered into tiny pieces and distributed over the internet.
List of the sources
To honor all the work I will start with the list of sources before the post:
Prerequisites
A minimal reasonable setup will require two virtual hosts. You can do this all on a singular machine too but hey, we would like to build a cluster setup! I will do it with two/three virtual machines.
Install Podman on all virtual machines
I use Ubuntu 18.04 for this demo because we are using Ubuntu massively and we already use Ansible for the installation. Therefore it is easy for me to setup them quickly. The installation of Podman itself is easy as well - I’ve taken my information from [1]. The summary of the linked article is:
> apt update
> apt -y  install software-properties-common
> add-apt-repository -y ppa:projectatomic/ppa
> apt -y install podman
> mkdir -p /etc/containers
> curl https://raw.githubusercontent.com/projectatomic/registries/master/registries.fedora -o /etc/containers/registries.conf
> curl https://raw.githubusercontent.com/containers/skopeo/master/default-policy.json -o /etc/containers/policy.json
Install Podman on all of your hosts.
Install Open vSwitch
Open vSwitch can be installed easily by using the Ubuntu package management. If you would like to see a Kubernetes CNI plugin which is working with this technology, take a look at [10].
> apt install openvswitch-switch
Configure Open vSwitch and create the overlay network
For this section most of the information is coming from the article referenced in [2] and [3]. These are really, really great articles and if you have the time, do yourself a favor and read it!
Creating the namespace for the Open vSwitch bridge an create the VXLAN connection
All of the following commands will be executed on all of our virtual machines.
First of all, we will create a separate network namespace where our Open vSwitch bridge will be placed in. We will name the namespace like we name our Open vSwitch bridge later.
> ip netns add ovsbr0
Now we create the Open vSwitch bridge inside the already created namespace:
> ip netns exec ovsbr0 ovs-vsctl add-br ovsbr0
After that, bring up the interface of the our ovsbr0 Open vSwitch:
> ip link set ovsbr0 up
Next we will create a VXLAN interface. I will do this with the Open vSwitch capabilities, because it is more commonly used today (like it is used in OpenShift). For most of the parts, [4] was enormous helpful! Ok, let’s start! The following command will establish an interface, called podvxlanA that will be connected to the remote virtual machine. For this task the default port for VXLAN, port 4789, is used [5]. This will be the VXLAN for our inter-Pod connection. The key keyword is important as it is used to identify the VXLAN. The psk option is used for the encryption of the VXLAN traffic. There are different encryption methods available, for this example I choose the simplest method. More information about it can be found under [6].
> ovs-vsctl add-port ovsbr0 podvxlanA -- set interface podvxlanA type=vxlan options:remote_ip=10.0.0.3 options:key=5000 options:psk=swordfish
Use the same commands on the other hosts to connect to the first one (use the ip address from the first one):
> ovs-vsctl add-port ovsbr0 podvxlanA -- set interface podvxlanA type=vxlan options:remote_ip=10.0.0.2 options:key=5000 options:psk=swordfish
If you are submitting a netstat command after the correct use of the previous commands, you should see the default port up and running on each host.
> netstat -ntulp | grep 4789
udp        0      0 0.0.0.0:4789            0.0.0.0:*                           -
udp6       0      0 :::4789                 :::*                                -
Create a POD, add VETH interfaces and plug it into the vSwitch
At first we start a Pod, without network interfaces (beside the lo adapter) and after the Pod is started, we have to lookup the namespace of the Pod as we will need it later.
> podman run -d --net=none alpine sh -c 'while sleep 3600; do :; done'
After we have started the pod without a network, we will lookup its namespace. This can be done with the lsns command for example and in fact we are interested in the net namespace. The number in the middle, in this example 9444, is the namespace number which we need in the next steps to assign an interface to the Pod.
> lsns
4026532727 net         2  9444 root            sh -c while sleep 3600; do :; done
You can verify the current ip configuration of the Pod with the nsenter command:
> nsenter -t 9444 -n ip a
1: lo: <LOOPBACK,UP,LOWER_UP> mtu 65536 qdisc noqueue state UNKNOWN group default qlen 1000
    link/loopback 00:00:00:00:00:00 brd 00:00:00:00:00:00
    inet 127.0.0.1/8 scope host lo
       valid_lft forever preferred_lft forever
    inet6 ::1/128 scope host
       valid_lft forever preferred_lft forever
No we create the VETH pair. A VETH pair acts like a virtual patch cable. You can plug in one side into the vSwitch and the other one into the namespace of the Pod [7]. If you create the VETH pair like in the following example, both ends will be placed in the default namespace[3].
> ip link add dev podA-ovs type veth peer name podA-netns
And now the fun starts. First, we will put the end of our virtual patch cable which is named podA-netns into the namespace of our running Pod.
> ip link set netns 9444 dev podA-netns
Verify it by running the nsenter command.
> nsenter -t 9444 -n ip a
1: lo: <LOOPBACK,UP,LOWER_UP> mtu 65536 qdisc noqueue state UNKNOWN group default qlen 1000
    link/loopback 00:00:00:00:00:00 brd 00:00:00:00:00:00
    inet 127.0.0.1/8 scope host lo
       valid_lft forever preferred_lft forever
    inet6 ::1/128 scope host
       valid_lft forever preferred_lft forever
13: podA-netns@if14: <BROADCAST,MULTICAST> mtu 1500 qdisc noop state DOWN group default qlen 1000
    link/ether 0e:19:51:5f:6a:fe brd ff:ff:ff:ff:ff:ff link-netnsid 0
Hooray, our Pod has a network device now! And now, plug the other end of our virtual patch cable into the vSwitch!
> ovs-vsctl add-port ovsbr0 podA-ovs
As you can see in the above ip a output, the state of the VETH device ends is DOWN - we can change this, from inside the pod by running an additional nsenter command (nsenter is really powerful):
> nsenter -t 9444 -n ip link set podA-netns up
> ip link set podA-ovs up
Now as both sides of the VETH devices are in UP state, we can assign a ip address to the interface inside the Pod and verify that it is set.
> nsenter -t 9444 -n ip addr add 172.16.0.10/12 dev podA-netns
> nsenter -t 9444 -n ip a
1: lo: <LOOPBACK,UP,LOWER_UP> mtu 65536 qdisc noqueue state UNKNOWN group default qlen 1000
    link/loopback 00:00:00:00:00:00 brd 00:00:00:00:00:00
    inet 127.0.0.1/8 scope host lo
       valid_lft forever preferred_lft forever
    inet6 ::1/128 scope host
       valid_lft forever preferred_lft forever
13: podA-netns@if14: <BROADCAST,MULTICAST,UP,LOWER_UP> mtu 1500 qdisc noqueue state UP group default qlen 1000
    link/ether 0e:19:51:5f:6a:fe brd ff:ff:ff:ff:ff:ff link-netnsid 0
    inet 172.16.0.10/12 scope global podA-netns
       valid_lft forever preferred_lft forever
    inet6 fe80::c19:51ff:fe5f:6afe/64 scope link
       valid_lft forever preferred_lft forever
Next we will do the same on the other virtual machine, I will paste only the command here in summary:
> podman run -d --net=none alpine sh -c 'while sleep 3600; do :; done'
> lsns
4026532727 net         2  5239 root            sh -c while sleep 3600; do :; done
> ip link add dev podB-ovs type veth peer name podB-netns
> ip link set netns 5239 dev podB-netns
> ovs-vsctl add-port ovsbr0 podB-ovs
> nsenter -t 5239 -n ip link set podB-netns up
> ip link set podB-ovs up
> nsenter -t 5239 -n ip addr add 172.16.0.11/12 dev podB-netns
Check the connection
Afterwards you should be able to ping from inside your Pods the other Pods.
> ip a
1: lo: <LOOPBACK,UP,LOWER_UP> mtu 65536 qdisc noqueue state UNKNOWN qlen 1000
    link/loopback 00:00:00:00:00:00 brd 00:00:00:00:00:00
    inet 127.0.0.1/8 scope host lo
       valid_lft forever preferred_lft forever
    inet6 ::1/128 scope host
       valid_lft forever preferred_lft forever
20: podB-netns@if21: <BROADCAST,MULTICAST,UP,LOWER_UP,M-DOWN> mtu 1500 qdisc noqueue state UP qlen 1000
    link/ether a6:2e:fe:d8:f4:c3 brd ff:ff:ff:ff:ff:ff
    inet 172.16.0.11/12 scope global podB-netns
       valid_lft forever preferred_lft forever
    inet6 fe80::a42e:feff:fed8:f4c3/64 scope link
       valid_lft forever preferred_lft forever
/
> ping 172.16.10
PING 172.16.10 (172.16.0.10): 56 data bytes
64 bytes from 172.16.0.10: seq=0 ttl=64 time=1.070 ms
--- 172.16.10 ping statistics ---
1 packets transmitted, 1 packets received, 0% packet loss
round-trip min/avg/max = 1.070/1.070/1.070 ms
Egress and Ingress traffic
Ok, our Pods are now able to communicate which each other through different host via the VXLAN tunnel. This is great, but they cannot communicate to the outside world. Therefore we have to setup an additional interface, which will be connected to the Open vSwitch on one side and to our host on the other side. Currently the host itself does not know anything about the overly network which we build via the Open vSwitch because the host does not have an interface on the overlay network and vice versa.
Egress
On every host we create the same interface combination to allow the host to talk to the vSwitch and to allow the traffic flow to our Pods on the overlay network!
> ip link add pod-gatewayhost type veth peer name pod-gatewayovs
> ovs-vsctl add-port ovsbr0  pod-gatewayovs
> ip link set pod-gatewayovs up
> ip link set pod-gatewayhost up
> ip addr add 172.16.0.1/12 dev pod-gatewayhost
If you check the route information on the host afterwards, there will be the correct entry created automatically for the overlay network. Also check the vSwitch if the port is plugged in.
> ip r
default via 10.200.60.10 dev ens160 proto static
...
172.16.0.0/12 dev pod-gatewayhost proto kernel scope link src 172.16.0.1
ovs-vsctl show
0ef0dbc7-2d98-4554-801c-d4fc36f246dc
    Bridge "ovsbr0"
        Port podvxlanA
            Interface podvxlanA
                type: vxlan
                options: {key="5000", psk=swordfish, remote_ip="10.0.0.3"}
        Port pod-gatewayovs
            Interface pod-gatewayovs
        Port podB-ovs
            Interface podB-ovs
        Port "ovsbr0"
            Interface "ovsbr0"
                type: internal
    ovs_version: "2.9.2"
From inside the Pod on this host, you can ping the traffic gateway now:
ping -c 1 172.16.0.1
PING 172.16.0.1 (172.16.0.1): 56 data bytes
64 bytes from 172.16.0.1: seq=0 ttl=64 time=0.388 ms

--- 172.16.0.1 ping statistics ---
1 packets transmitted, 1 packets received, 0% packet loss
round-trip min/avg/max = 0.388/0.388/0.388 ms
As we now have a gateway, apply a default gateway route to the Pod:
nsenter -t 5239 -n ip route add default via 172.16.0.1 dev podB-netns
Verify the setup from inside the Pod:
> ip r
default via 172.16.0.1 dev podB-netns
172.16.0.0/12 dev podB-netns scope link  src 172.16.0.11
From now on it should be possible to ping your hosts ip address - the ip address of the host this Pod is running on!
> ping -c 1 10.0.0.2
PING 10.0.0.2 (10.0.0.2): 56 data bytes
64 bytes from 10.0.0.2: seq=0 ttl=64 time=0.528 ms

--- 10.0.0.2 ping statistics ---
1 packets transmitted, 1 packets received, 0% packet loss
round-trip min/avg/max = 0.528/0.528/0.528 ms
But we cannot update the Alpine image, because there is no routing setup up on the host! Therefore enable ip forwarding in the host, if it is not already set! Caution We are not using any iptable rules here, therefore everything can be forwarded through this host!
> sysctl -w net.ipv4.ip_forward=1
Next, add a dns server name for the Pod from inside the Pod - if needed use your on-premise DNS server here!
> echo 'nameserver 8.8.8.8' > /etc/resolv.conf
And last but not least, we have to enable IP masquerading[8] as otherwise the communication back from the external network to the Pod is not possible:
> iptables -t nat -A POSTROUTING -o ens160 -j MASQUERADE
> iptables -t nat -L -n -v
And finally try to apk update your server!
apk update
fetch http://dl-cdn.alpinelinux.org/alpine/v3.10/main/x86_64/APKINDEX.tar.gz
fetch http://dl-cdn.alpinelinux.org/alpine/v3.10/community/x86_64/APKINDEX.tar.gz
v3.10.2-80-g68e4e4a13a [http://dl-cdn.alpinelinux.org/alpine/v3.10/main]
v3.10.2-80-g68e4e4a13a [http://dl-cdn.alpinelinux.org/alpine/v3.10/community]
OK: 10336 distinct packages available
Congratulation - Egress traffic is established. Now you have to do the same on the second host for the other Pod. Remember to change the ued namespace in the nsenter commands!
Ingress
OK, and now the last part. How we can get traffic to the pods? Docker is using docker-proxy for this task, Podman uses the conmon and Kubernetes is going to use kube-proxy for this task by default. We have started our Podman Pod without an network and therefore the conmon process is not forwarding anything to the Pod from our host machine. But there is a cool tool on the internet, called tcpforward [9]. You can just git clone the repository from Github and run a go build on it.
To enhance the current setup, we add a second ip address to our LAN interface. This will enable us to use multiple ip addresses on one host and therefore we can use the SSL port multiple times later in an enhanced setup!
> ip addr add 10.0.0.5/16 dev ens160
Then we run the compiled binary to forward tcp traffic to one of our Pods through the second ip address created before:
 > ./tcpforward -l 10.0.0.5:1234 -r 172.16.0.11:9000
tcpforward: : 2019/09/27 12:15:35 Accepted connection from 10.0.0.250:51020
tcpforward: : 2019/09/27 12:15:42 Forwarding from 10.0.0.5:1234 to 172.16.0.11:9000
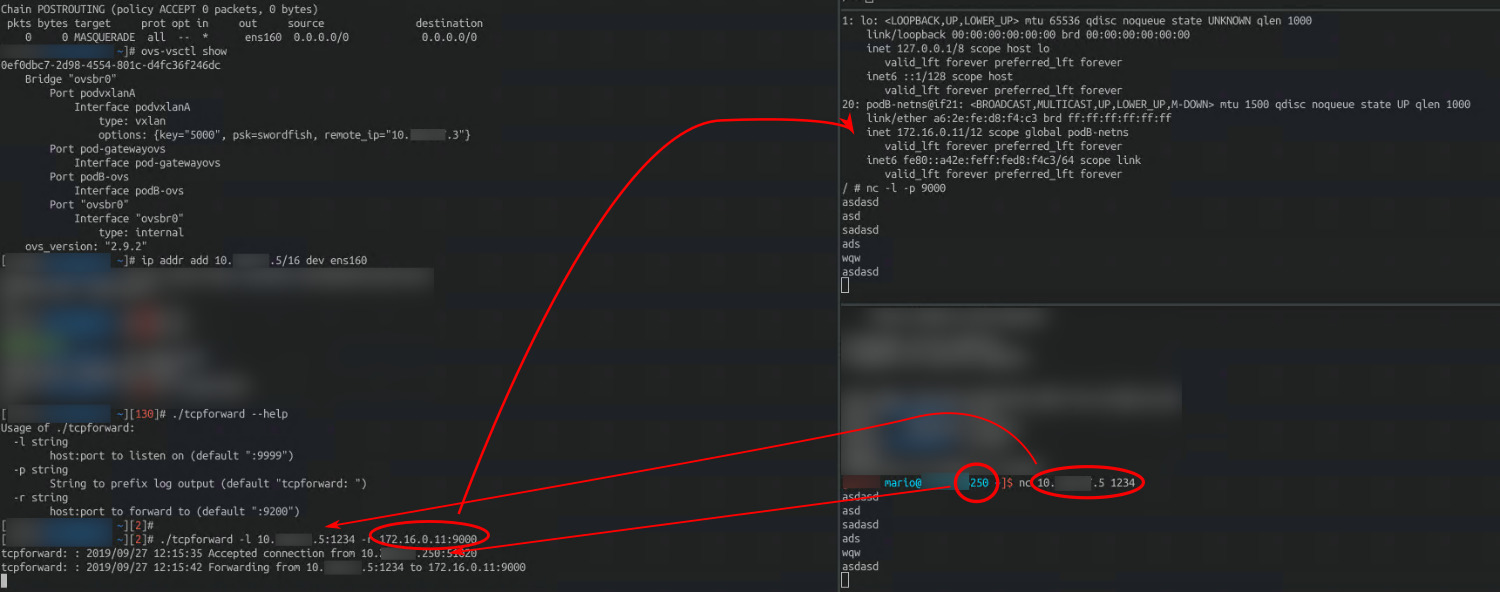
nc -l -p 9000 inside the connected Pod and run a nc 10.0.0.5 1234 somewhere on your network. Type in some characters and see them echoed inside the Pod!
YES! 🎉
Summary and outlook
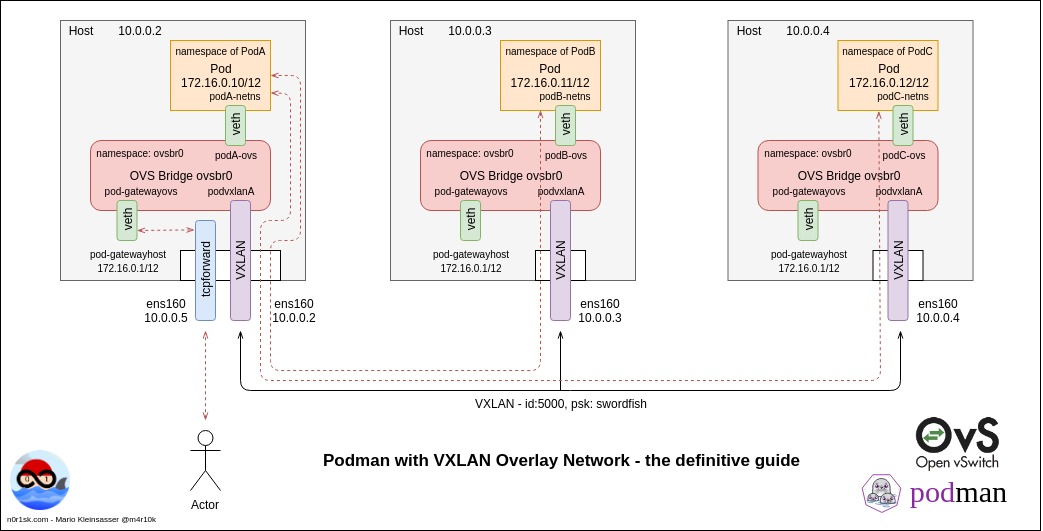
As you can see, the shown result isn’t excatly what you have seen in my sketch at the beginning of this post but you can easily extend the show solution by yourself. Just take the commands used during this simplier setup and span it on a third node. The post itself shows the technical background on how Docker Swarm overlay networks and overlay networks in general can be build. Podman is a cool solution but with the lack of a build in overlay network solution it is only a starter kit. With the information from this post you could build a Kuberentes like solution on your own (if you take the time) 🤣
I would like to say thank you to all of the people out on the internet who are sharing their experiences - without them a lot of information would be still not available today.
If you like, reach out for me on Twitter!
Mario
 Doing Linux since 2000 and containers since 2009. Like to hack new and interesting stuff. Containers, Python, DevOps, automation and so on. Interested in science and I like to read (if I found the time). My motto is "𝗜𝗺𝗮𝗴𝗶𝗻𝗮𝘁𝗶𝗼𝗻 𝗶𝘀 𝗺𝗼𝗿𝗲 𝗶𝗺𝗽𝗼𝗿𝘁𝗮𝗻𝘁 𝘁𝗵𝗮𝗻 𝗸𝗻𝗼𝘄𝗹𝗲𝗱𝗴𝗲. [Einstein]". Interesting contacts are always welcome - nice to meet you out there - if you like, do not hesitate and contact me!
